Friday, March 16, 2018
Thursday, May 20, 2010
#8 Exploring Perspective
We all have to decide what we will use as our subject to make a photograph, but that is just the beginning of the image creation process. The next thing we must decide is where (what perspective) to capture the image from.

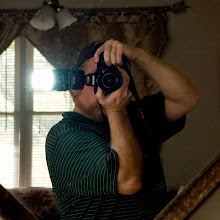
My old Bogen (Manfrotto) tripod allows me to remove and invert the center column. This allows positioning of the camera just inches above the ground as in the image above.
There are a few basics to think about when choosing the best perspective for capturing your image. The first thing to remember is that your zoom lens should never be used as a replacement for your feet. If you want to get close up, get as physically close to your subject as possible and then zoom in if necessary. Second, keep in mind the fact that adult eye-level is by far the most common perspective making it the most difficult perspective to use in creating really interesting images. Old twin lens reflex cameras (Mamyia C330, Yashicamat 124G) have pop up viewfinders that the photographer looks down into when composing the image (the same is true for the Hasselblad). Because you have to look down into it, the photographer normally holds the camera at a position of about three feet - significantly lower than the normal 35mm or DSLR perspective. Images taken at this lower angle have a magical way of reminding us of childhood when we all saw the world from a much lower perspective. This lower perspective is also often preferred for portraits.
The important thing is to be aware of your position and don't allow yourself to be tied to the same old adult eye level perspective all of the time. The greatest thing about digital photography is the freedom we have to experiment and explore without having to use up finite resources such as film and chemistry. Try seeing the world from different angles. A well chosen perspective can help you achieve superior results.
Saturday, February 27, 2010
#7 Tips For Making Your Best Travel Pictures
There is something special about the intense inspiration some artists feel when they are in a fresh location. If that location happens to be an exotic foreign land, that's even better. Travel is good for the soul and your portfolio. A friend of mine is planning a vacation in Mexico. This has inspired me to write a short blog with tips for the traveling photographer. So I hope this helps you the next time you're getting ready to go on a vacation. A bit of prep time will help you take lots of wonderful photographs while having a safe and fun adventure.
Make sure your equipment is in good working order. Take a few pictures a couple of days before you leave and look at them zoomed in close in your image editing software (i.e. iphoto or Photoscape). Check to be sure you've charged up any extra batteries you carry. Some of the newer rechargeables don't hold power well if they sit unused for long periods of time. If you're going to be in a different country, be sure you have whatever adapters you'll need to recharge your batteries on a foreign power grid. Don't forget to take plenty of memory cards (they're really cheap these days) and format all of your memory cards before you leave. Make sure you've transferred all your old files to your computer first, of course.
Check to see that your lens is nice and clean. The trick to cleaning your lens is to never get it dirty (no kidding). Don't freak out if you do have to clean the lens with a few drops of fluid and a microfiber cloth, but remember to be very gentle and that at the microscopic level you are scratching your lens every time you have to clean it this way. It doesn't hurt the lens to gently dust it off with a soft camel hair brush or very lite, short burst of compressed air. If you're an environmentalist, the brush is your best bet.
If you are aware of particular sites where you are especially interesting in doing some photography, you can go on Google Earth and zoom in to see just how the site where you wish to photograph is oriented by the compass. Once you know what direction you'll be facing when you make your exposures, you can easily determine when the sun is going to be behind you giving you the very best lighting conditions for your photograph. Now this may be a bit more work than you were thinking of doing, but if you try it for one site this trip and see how amazing your photos look you'll want to do this for multiple sites the next time you travel. When you composs your images, try and make sure you get your horizons level and leave a little room so you can crop the image latter. If the image isn't perfectly level, you can adjust it latter as long as you leave yourself a bit of extra space around your subject.
Most scenic photographs are made early in the morning and late in the afternoon when the light is warm (yellow) and the shadows are long. I like to shoot scenic images with the my camera set on the "A" (aperture priority) mode. If it's a bright sunny day I set the camera on ISO 100. On an overcast day I'll use ISO 400. Unless you have a brand new camera, ISO settings above 400 will result in digital "noise" (tiny specks of random color) in the darkest shadows in your photograph. You can fix that in post processing, but try to keep your editing chores to a minimum by avoiding noise in the capture. Once you have the ISO set, increase the aperture to the highest setting possible while keeping the shutter-speed high enough to prevent blur. On an 18-55mm lens, 1/60s should be fast enough for still subjects. If you use a longer lens, you'll need to use a faster shutter-speed. Take the highest number of the focal length (i.e. 200 on a 55-200mm) and enter it as x in the equation 1/x. The closest shutter-speed to the result should be safe for making sharp images.
When taking pictures of people, most pros like to use flash even outdoors in broad daylight. The flash will open up any shadows on your subjects and add "catchlights" (tiny white reflections) to add a "sparkle" to their eyes. Don't forget to check all of your camera's basic settings and return anything that is awry to it's proper setting. Not doing this can lead to truly nasty surprises latter. One final thing to remember is that when you are shooting over water or snow the bright scene will trick the camera's light meter causes your pictures to come out too dark. Most digital camera's have a EV+/- control for exposure adjustments. Settings of +1 or just a bit higher will usually give you the results you want.
With a little preparation, you can enjoy your trip with no worries that your photographs won't come out the way you plan. Your memories will be even more special to you when you look at your own high quality photographs that remind you of the all fun you had and the wonderful sites you visited.
Happy Shooting :-)
Al Williams
Wednesday, February 17, 2010
#6 Image Editing Software: Photoscape

Photoscape's Main Screen
"Figure out what works and stick with it," was one of the first concepts I learned twenty years ago in Photographic Design 101. This basic piece of advice is the key to achieving consistent technical quality in your images. In the old days, you'd chose one film, one paper, one set of chemicals and you practiced with them until you became completely familiar with them. An intimate knowledge of your working tools and materials frees you to concentrate on the more subjective aspects of the art. Unfortunately, imaging technology has been changing so quickly over the last ten years that we are always having to relearn our craft . While I'm sure there are many exciting inovations yet to come, some aspects of digital imaging have become standardized.
The transition to digital photography has given us more post capture power over our images than any of us ever imagined possible back in the film era. Unfortunately that has made post processing both more complicated and understanding it more important to the photographer than it was prior to digital. You are never going to get the best out of your images if you just shoot JPG's and shoot them straight off to a processing service. Individual attention allways produces the best results. Just how much work needs to be done on an image by image basis and what can be done in batches is something that each photographer must decide for herself.
In the world of image editing software, Adobe (maker of CS4, Lightroom, Photoshop Elements, etc.) is the undisputed king. Unfortunately, even their least expensive product, Photoshop Elements, is still beyond the reach of many who wish to explore their creativity through photography. Luckily there are other options that don't require you to fork out hundreds of dollars or even a single penny. The free image editor called GIMP is the most powerful and well know of these. The only real downside to GIMP is its steep learning curve. If you write computer programs in your spare time, you'll feel right at home with GIMP. This is a great program, but much more complex than many photographers require. As I learn more about working with images in GIMP, I'll be writing more about it , but first let's start with something a bit easier.
Photoscape is a good choice for anyone who needs a free basic imaging editor. While the serious artist will eventually want to move up to something more powerful and "hands on," Photoscape has a lot to offer. Some of its features such as the "Screen Capture" utility (which I used for the captures in this blog) are useful even to someone with advanced editing skills. One of the treads today is to simplify and streamline the image processing work flow. Trying to do basic tasks with one of the full powered image editors can be too time consuming. That's why Adobe's Lightroom program which allows the photographer to take care of basic editing chores easily is becoming the first choice of pros who only open Photoshop when things get ugly. You may find that Photoscape fulfills the same basic need for your photography and you can turn to the GIMP when you need its powerful features. Of course, if you have the fifteen hundred or so dollars to spend on software, by all means go with Lightroom, Photoshop CS4 and plug-ins (if there's any money left for them).
Photoscape is designed around a main screen (see above). From this main screen you can access all the utilities Photoscape offers. Most of the utilities are pretty much self explanatory. Clicking on the help icon in the upper right hand corner will open the help pages that briefly explain how each of Photoscape's features works. Probably the most complicated screen in the editor shown below.

Photoscape's Editor Screen
You select the file you wish to edit on the left hand side of the screen. The actual editing controls are below the selected image. Photoscape offers both automated editing options and more precise controls. Most of the automated editing options offered in Photoscape come in low, medium and high. Basic sharpening is available on a scale of 1 to 13. In the few images I've tested, the low settings and a light touch on the more precise controls will produce the best results. If you don't like or feel that you've overdone a change, simply click the "Undo" button on the bottom right. You can also "Undo All" to return the image to its original state if necessary. One of the coolest feature that I've found in Photoscape (so far) is the ability to simulate a few of my favorite old film emulsions though, once again, "low" was usually the only setting that didn't overdo things for my taste.
The pull down menus for the "Bright, Color" and "Filter" tabs offer a host of options to adjust or enhance color, brightness, highlights and shadows and many more esoteric possibilities. If you need more advanced control, clicking on the "Resize," "Bright, Color," "Sharpening" and "Bloom" tabs open up windows with more precise controls (i.e. sliders). The only way to become familiar with these controls and how they effect your images is to spend some time playing around with them. Try moving each of the sliders slowly as far as you can in both directions and watch how the image changes.
Here is an example of an image that I shot with my Pentax K10D as a 10MP JPG and edited with Photoscape:

I started off by clicking on the "Crop" tab and setting it for 8x10. Once I had the image cropped as you see above, my next step was to select the "low" setting on "Auto Levels." I then set the "Sharpen" control to 5. After that, I chose "Filter" - "Film Effect" - "Provia" - "Low." Finally I saved the image as a JPG file so I could use it in this blog. If I had intended to make a print of the image, I would have saved it as a lossless PNG file. Always save your image as a PNG after editing in Photoscape if you ever want to print it at full resolution. Unfortunately, Photoscape recognizes TIFF files as RAW and won't allow you to save your work as a TIFF file. PNG is the only lossless compression file type offered. If you need a JPG file for the internet or for a commercial printing service, make sure that you only save as a JPG once as your very last step.
Here is what Photoscape's "Print" screen looks like:

Drag and drop the photo (or photos) you want to print out on the page and drop them in the center. All your controls are on the right hand side of the screen. You'll need to either select "Portrait Shot Print" and your print size or "Thumbnail Print" if you want to make a contact sheet to examine multiple images. Make sure to click on "Print Setup" to check your printer settings before you hit "Print."
Photoscape includes several additional features. "Viewer" and "Batch Editor" are quite simple and don't require explanation. Try selecting images you are trying to choose from (just hold down the "control" key to select multiple images) in the Viewer or Editor and click the slide show icon in the upper right hand corner of the screen. This will cycle through the selected images in at full size using the whole screen with basic image data in the center of the screen at the bottom. Next to the slide show icon is the EXIF icon. Clicking this icon pulls up the detailed exif info (the date, time and exposure data recorded when you captured your image). On the other side of the slide show icon you'll find a useful icon you can click any time you want to copy the current image to the clipboard.
The "Page" feature allows you to combine multiple images onto a single page to allow package printing and various montages. "Combine" is similar but much more of a free form affair. "AniGif" lets you create GIF animations (internet slide shows) from your images. "Splitter" is basically the opposite of "Combine," and finally "Paper Print" allows you to print various common types of paper such a ruled, graph, calender, and even sheet music manuscript pages.
There were only a couple of features I felt let down by. The "RAW Converter" basically just opens your RAW file in the editor. Anyone taking the time to shoot RAW is going to want a more powerful converter than the one offered here. Photoscape does allow you to work with color, saturation and luminance curves. Curves offer the most precise level of control over your images. Since Photoscape doesn't include a normal color balance function, you'll have to use its curves function for precise color corrections. Unfortunately the black, gray and white eyedroppers that many of us like to use with this advanced tool are not present. If you're advanced enough to work with curves, you'll probably be happier doing so with a more powerful software package like GIMP. As a free basic image editor Photoscape's limitations are acceptable and it is the best software I've found that fits that description. It's actually a pretty powerful little package.
If you'd like to try a free download of Photoscape click here. Whatever software combination you choose for your image editing needs, try and become as familiar with it as possible. Try to come up with a basic routine for the majority of your images so you can process them quickly and save time for images that present more of a challenge. You'll always want to keep learning new tricks or updates for your software, but settle on software that works for you and work on improving you're skills at capturing and editing images. While better tools will always provide some advantage, the real advantage goes to the photographer that knows how to get the very best out of the tools he has.
If you have questions about using any of Photoscape's features or any questions about how to edit your images to bring out their best, feel free to write me at theelephantseye@gmail.com and I'll do my best to answer your questions either through a personal email or a future blog entry. I hope you will find joy in both capturing images and editing them to make them look their very best.
Al Williams
Wednesday, February 3, 2010
#5 Composite Photographs - Beyond The Edge Of The Frame

In one of my first posts, #2 Stiched Panoramas, you'll find the first version of this image created using Photoshop CS3's "Photomerge" automation. Above is the new version which I'm much, much happier with. In order to allow my students, none of whom have Photoshop, to explore the incredible possibilities created by composting images, I decided to have a look at any free software that might be available.
Microsoft ICE (Image Composite Editor) was a complete surprise. While I realize that CS3 is rather outdated at this point, I didn't expect a free program to blow it away at anything. That's just what Microsoft ICE did. The image above required zero retouching to hide the signs of stitching that I worked so hard to remove in the first version.
You can download the full (not a trial) version for free [here]. The program was developed by Microsoft but never beyond this free version to a commercial product. Since the free version works great, that's a good thing.
The program is very simple to use. You can drag and drop your files onto the programs window and it goes to work. Be patient. I ran almost 100 JPG files through it at once on one occasion and it took well over an hour to process. If you are dealing with 20 or so images, it should only take a few minutes. If it seems "stuck" when the progress bar is complete on the "solving" screen, just left click the bar at the top of the screen and it will go on to "compositing" (at least this has always worked for me).
Here is what the main screen of Microsoft ICE looks like:

After you've dragged and dropped your files into the gray area (or added via the "File" drop down menu) and the program presents you with the result, click on the Perspective icon (last of the icons on the top left, the one next to the Crop icon). This will allow you to adjust the perspective of the composite image. You can move it up and down or left and right. Moving the image up will have the effect of making the top of the image tilt towards you. Play around with moving the image and trying the different perspective options until you find the most pleasing adjustment.
I hope you'll try out this exciting photographic technique. As a late adopter of digital, I never dreamed that digital photography would set us free from the limits of a single frame and allow us to create images with perspectives we couldn't even dream of in the past. Imagine the unexplored possibilities offered by digital imaging that still await us in the future.
Happy Shooting,
Al Williams
Monday, February 1, 2010
#4 "Making Photographs"

Water Fowl on the pond at Matthews Park in Monroe, GA
1 February 2010
I'm just beginning to learn this art of blogging. My last attempt ran a bit long both for the genre and the attention span of the vast majority of my potential audience. So, following the advice of one of my readers (thanks Jezz :-) I'll be reworking that material in order to make it more useful in this format. In the near future, I'll be posting this reworked material as a three part series of blogs on the three basic exposure controls: aperture, shutter speed and ISO. For the moment, however, I'd like to turn to a matter of a more philosophical nature.
How do we describe the process through which we begin the creation of a photograph? What do we say we are doing when we make a "capture?" The most common phrase would be "taking a picture." There is a distinction one can make, however, between "taking" pictures and "making" photographs." "Taking" a picture can imply that the image is somewhere out there and we just have to be smart enough or lucky enough to find it. "Taking pictures" evokes visions of a relative making snapshots at the family barbecue. It can be thought of as a hit or miss affair owing more to chance than skill or artistic intention.
This isn't to say that "capturing" an image has to be hit or miss. Capturing the decisive, "Cartier-Bresson", moment is full of artistic intention. There is an element of chance, but not an overwhelming one. As Susan Sontag writes in her collection of essays, On Photography, photography is the ultimate way for our conscious to utilize its "acquisitive mode." The photographic artist is "taking" something see finds in her world, but she isn't merely "taking" something. There is more to it than that.
Real photographers "make photographs." Making photographs can be seen as the conscious effort to create a work of art by "writing with light." The key element here is artistic intent. While the capacity of our memory cards has made the necessity of previsulization a thing of the past, it is still useful as a part of the creative process and the serious artist doesn't just wonder around hoping a photograph will happen. You must put yourself in the right place at the right time and have the skill at setting the best exposure that can only come through lots and lots of practice. When you posses this skill and you are able to be at just the right spot at just the right moment, ever once in awhile divine providence will shine down upon you and you'll have the opportunity to create a uniquely captivating work of art. That's the moment the fine art photographer lives for and it is one of the sweetest feelings I've known.
For more information on Henri Cartier-Bresson, the Wikipedia article is [here]. The article on Susan Sontag is [here].
Al Williams
Monday, January 25, 2010
#3 Beyond Auto – Understanding Basic Exposure Controls

[Note to the reader: this entry is intended to be a review for students that already have some knowledge of camera controls. If you are a beginner, don't try to take all of this in at one time. I'll be more than happy to address any questions you might have on any topic you find confusing. You can contact me at theelephantseyephoto@yahoo.com for more info. It usually takes several weeks of basic photography classes to allow all of the following info to sink in.]
Most digital point and shoot cameras and pretty much all consumer and prosumer level DSLRs have numerous “scene” modes that allow the novice photographer to capture acceptable images even in some of the most difficult lighting situations. When set to one of their full auto modes, many of these cameras can analyze the scene and do a better job of setting exposure than many beginners. So if the cameras have such good onboard computers and software, why should the artist take the time to learn the how to manually set the camera’s exposure controls? Why not let the camera do all that “exposure” stuff and concentrate on finding interesting subjects and getting the best composition? First let’s back up a bit and go over what we mean by the term “exposure.”
Back in the film days, in order to capture an image you had to expose a piece of film to produce a negative. Because of this the term "exposure" is often used as a synonym for what digital photographers refer to as a "capture." When you press the shutter button and create an image, that original data file and the image it represents is the "capture." The other, and for the moment more important meaning of the term “exposure," is how dark or light an individual capture turns out to be. With our photo editing software we can adjust the exposure long after the original capture. So why can't we just shoot pictures and worry about exposure when we edit? Well, while we can adjust the exposure to some degree in post processing, if the image is so light that the light parts of the image go white or so dark the shadows go black, we cannot restore information that was not included in the original capture. If you take a really dark image and brighten it up in your image editing software, you’ll see that the image comes apart before it is lightened nearly enough. Even if you image is just a little too dark, it can come out looking “flat” (too low contrast) when it is adjusted to an acceptable brightness.
The most advanced cameras will still fail to choose the very best exposure in every situation. Even at their best, automatic camera controls (when they work properly) produce “average” results. While an “average” exposure might be more than adequate for the casual snapshot photographer, anyone pursuing photography as a serious means of creative expression is well served by taking the time to develop a thorough knowledge of camera controls and how to use the more advanced camera modes or manual mode to choose the very best possible exposure and allow for the possibility of making extremely large, high quality prints.
Once you understand the basics of exposure control and how to operate your camera in manual mode, you’ll not only be able to utilize the “A” (aperture priority) and “S” (shutter priority) modes on your camera but you’ll also be able to understand how those “scene” modes actually work in the first place. Knowing how they work will allow you to decide when you can get away with using them and when the situation calls for more precise, hands on control. This knowledge also opens the door to some very specialized types of photography such as night photography which are, if not totally impossible, extremely limited in automatic exposure modes.
The Three Factors
Many creative people find the technical side of photography a bit daunting. The plethora of bells and whistles on today’s cameras, the menus, modes and functions can make using a DSLR seem as difficult to the novice as being called up from coach (without any previous training) to land a modern jet airliner. The reality of the situation however is much simpler. There are actually only three controls that one needs to understand to set a camera for the proper exposure. The first is the ISO or sensitivity to light (the digital equivalent of film speed). This is basically how much light is required for the sensor to register an image. The second control is the aperture. This is how much light is allowed to get through to the sensor and is controlled by making the hole the light passes through at the back of your lens larger or smaller. The third is the shutter speed. This is how long the shutter is open exposing the camera's sensor to the light.
The best “exposure” is the proper balance between these three controls. If you change one of the controls, you can still get the same exposure by changing one or both of the others to compensate. Different settings for each of the controls produce specific effects on the final image that your camera’s sensor records. By getting the exposure just right at the time of capture, we maintain as much shadow and highlight detail as possible and make our post capture editing a much smoother and quicker affair. While the screen can be quite forgiving, a bad exposure can make it impossible for you to get a good looking print.
When speaking of exposure adjustments, photographers often talk about "stops." Basically one "stop" is twice as much or half as much as you started with. When adjusting sensitivity for instance, ISO 200 is one stop faster than ISO 100. One stop faster than ISO 200 is ISO 400. Aperture (where the term originated as the f stop) works the same although the irregular sequence of numbers can be a bit confusing. If you're aperture is set to f/5.6 then f/8 is "stopping down" one stop. Half as much light is allowed in at f/8 as at f/5.6. Stopping down from f/8 in one stop increments goes f/11, f/16, etc.. If you want to open up to let in twice as much light as f/5.6 then you'd set the aperture to f/4. Shutter speeds as a bit easier to understand. If you're shutter speed is set at 1/60", then 1/30" is one stop slower and 1/125" is one stop faster. Most modern DSLRs can be set to allow adjustments in either 1/2 or 1/3 stop increments.
ISO (Sensitivity)
Before the advent of digital photography, photographers were very limited as to controlling the sensitivity of the films they used to capture images. Film speed (sensitivity) numbers were set by the ISO (that’s the common short name for the International Organization for Standardization). The term ISO is still used today in digital photography, but now it refers to how sensitive your camera’s sensor is to light. The numbers used to indicate ISO mean that at a given ISO your digital sensor has sensitivity equal to that of film of the same number or “speed.” On a bright, sunny day, a low sensitivity setting (100 to 200) will work just fine (and is usually preferable) because there is plenty of light to work with. The darker it gets, the more we must increase sensitivity if we want to maintain the same setting on the two other controls. The effect of the increasing sensitivity is usually lower color saturation and increased digital “noise." Digital noise shows up as random specs of color in the darkest shadows.
These days’ manufactures are racing to produce higher and higher image quality at higher and higher sensitivity settings. Generally, just about any decent camera of recent years should perform just fine at 400 and below. With a little noise reduction software, higher sensitivity settings are often quite acceptable. The easiest way to choose your sensitivity setting is to set it as low as you can and still set the other controls to produce the desired overall effect and proper exposure. Testing is always the best way to determine which ISO to use. Test your higher sensitivity settings and note where the noise in the shadows and quality of color become unacceptable for you. With the application of a post production noise filter, you might be pleasantly surprised at how high your ISO can be and still produce acceptable images.
Since it is the random specks of color that are the most offensive element of the noise inherent in images made at the highest ISO settings, you will probably find that if you intend your final image to be monochrome (such as black & white or sepia), the higher ISO settings might be more acceptable than they would be in a final image that you want to present in full color.
Aperture
The second control that determines exposure is the aperture. Behind your lens is a diaphragm which by opening or closing creates a larger or smaller hole for the light to pass through. The size of this opening is what we refer to as the "aperture." The larger the opening, the more light gets let in. As you increase the amount of light that reaches the sensor, you can use a lower sensitivity or a faster shutter-speed and achieve the same overall exposure. Apertures are indicated by numbers written as follow: f/8, f/11, f/16, etc... Beginners are almost always baffled by the numbers; the larger the number, the smaller the opening. Use the way it’s written to help you remember. If you think of the “f/#” as a fraction then they will no longer seem “backwards”. The math behind calculating the actual numbers and the reason that they seem to progress so unevenly are beyond both the scope of this article and my knowledge of the subject. I seem to remember it has something to do with logarithms (a word which tends to cause my brain to shut down).
So why not use a large aperture all of the time to take advantage of the higher image quality at lower ISO’s and the sharpness of faster shutter-speeds? Aperture influences your images “depth of field.” The “depth of field” of an image is the closest point in front of the camera that is in sharp focus to the furthest point in front of the camera that is in sharp focus. Sometimes we wish to make the background of an image blurry (out of focus) so that it doesn’t distract the viewer from our main subject. To do this we use a large aperture to achieve a very shallow or narrow depth of field. If we want as much of the image to be in sharp focus as possible, then we’ll choose a much smaller aperture often resulting in a long shutter-speed requiring the use of a tripod.
Keep in mind that the very smallest apertures are often not the very best for producing the sharpest overall image because of distortion inherent in lens design. Many photographers choose to avoid the very smallest apertures (highest number) especially of inexpensive zoom lenses. The only way to know for certain which aperture is best is to test your lens for yourself and note any problems. You may have to make test patches of a very big enlargement from your image in order to do this. It is important to perform this test before shooting images that you want to make huge enlargements from to avoid being disappointed with your results. If I had to make an image with a lens I hadn’t tested and wanted to get the sharpest image possible with maximum depth of field, I’d use the setting one stop bellow the smallest (highest numbered) aperture. As a rule of thumb, that is likely to be the best for producing the sharpest possible image, although some of the modern zooms have "sweet spots" at various apertures. F/8 and above are usually sufficient to achieve enough depth of field for most shots. If you want a blurred background, try using the largest (smallest f/#) aperture your lens allows. Try to put as much distance as possible between your subject and the background and get as close to the subject as you can. If you need more "blur," this can be enhanced in Photoshop with a bit of training and practice.
Shutter Speed
The third and final factor, shutter speed, is also the easiest to understand. The shutter speed is simply how long you allow the light to strike the sensor in your camera. If the shutter speed is too low, the image will exhibit “motion blur.” Motion blur occurs when the shutter is open long enough to record the movement of the subject as opposed to freezing it in place. When shooting flowing water and using a tripod, you can use motion blur to produce a magical, “flowing” look to the water. This should appear when your shutter speed is set to 1/15th of a second or longer.
So how fast is fast enough to avoid motion blur when shooting without a tripod? One of the special advantages of digital imaging is “image stabilization technology.” It is included on just about every camera made today (with the exception, perhaps, of the one on your cell phone – unless you have a really nice cell phone). Because of this, today that question is more complicated than it was back in the pre-digital era. Shutter speeds that use to be too slow and result in motion blur are fast enough to produce sharp, motion blur free images with today’s image stabilization technology activated.
The old rule was to take the reciprocal of the focal length you were using and that was the longest hand-held shutter speed. That would mean if you zoomed your lens in to 55mm you would need to use a shutter speed of at least 1/55th of a second or faster. These days with the image stabilization technology activated, a shutter speed of just 1/15th of a second might be fast enough if you were very careful to hold the camera as still as possible as you pressed the shutter release button. The image stabilization systems should give you about a two stop improvement on your longest, motion-blur free shutter speed. Using a monopod, which is much easier than setting up a tripod, can give you sharp images at even slower speeds. Once again, the only way to be sure of avoiding motion blur is to test your equipment and determine your minimum shutter speed for sharp hand-held and monopod photography.
Understanding these three factors and how they affect your images will allow you to scoff at the automatic “dummy” mode on your camera and take control of the images you produce. You’ll still have at least one use for the fully automatic mode on your DSLR assuming you occasionally hand your camera to someone who has zero photographic knowledge so they can make the photo and you can be one of the subjects in it. In the future, I’ll be going over how to use the histogram (the best way to judge the quality of an exposure in the field) in conjunction with the aperture priority and shutter priority modes available on most digital cameras to make capturing well exposed images as quick and easy as possible without giving up precise control over our three factors. I hope this has been a good primer or refresher on understanding basic exposure control.
Happy Shooting,
Al Williams
The Elephant’s Eye Photography
Subscribe to:
Posts (Atom)